Did you know that a simple mango pit from your delicious fruit snack can be transformed into a beautiful, majestic plant?
The process is not only fascinating, but also an excellent way to promote sustainability and embark on an exciting horticultural adventure.
In this comprehensive guide, we will explore the steps and techniques needed to successfully germinate a mango pit and nurture it into a thriving, fruit-bearing tree.
So, strap on your gardening gloves and get ready to become a mango maestro!
Step 1: Preparing the Mango Pit
The journey towards a majestic mango plant begins with preparing the pit. This step is crucial, as taking the time to properly prepare the pit will increase the chances of successful germination.
Choosing the Right Mango: Before you can prepare the pit, you must first choose the right mango. Select a ripe, healthy mango, as this will increase the likelihood of a viable seed. Mangoes with a deep orange or red color are typically the best candidates. Avoid mangoes with a green or pale yellow hue, as they may not have fully developed seeds.
Cleaning the Pit: Once you have enjoyed the scrumptious mango fruit, it’s time to clean the pit. Carefully remove any remaining fruit and rinse the pit under running water. Gently scrub the pit with a soft brush to remove any stubborn fruit residue. After cleaning, allow the pit to air dry for 24 hours.
Extracting the Seed: With the pit clean and dry, it’s time to extract the seed. Using a sharp knife, carefully make a shallow cut along the seam of the pit husk. Gently pry open the husk and remove the seed inside. This seed is what you will germinate into a mango plant.
Step 2: Germination Methods
There are several techniques for germinating a mango seed. Each method has its own set of benefits and drawbacks. In this section, we will explore three popular germination methods: the paper towel method, the water soak method, and the direct planting method.
- The Paper Towel Method: This method involves wrapping the mango seed in a damp paper towel and placing it in a plastic bag. The plastic bag should be left slightly open to allow for air circulation. Place the bag in a warm, dark area, such as a kitchen cabinet or closet. Check the seed daily for signs of germination and to ensure the paper towel remains moist. This method typically requires 2-4 weeks for germination.
- The Water Soak Method: In this method, the mango seed is placed in a container of water and left to soak for 24-48 hours. After soaking, the seed is removed from the water and placed on a damp paper towel. The paper towel is then folded over the seed and placed back in the container. The container should be covered with a lid or plastic wrap to maintain humidity. Place the container in a warm, dark area and check on the seed daily for signs of germination. This method generally takes 1-3 weeks for germination.
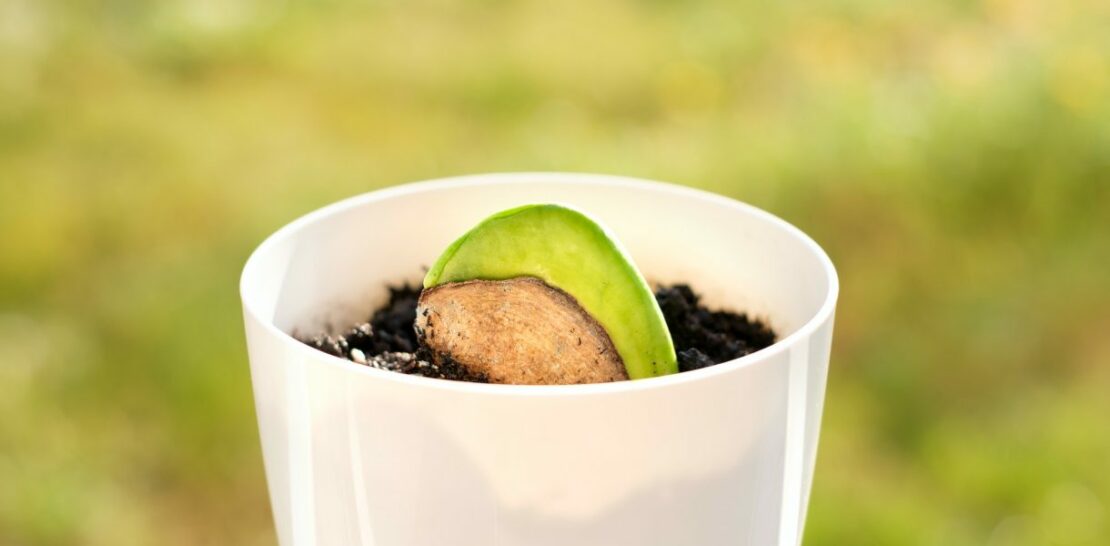
- The Direct Planting Method: This method involves planting the mango seed directly into a pot with soil. Fill a small pot with well-draining soil and plant the seed about 1-2 inches deep, with the concave side facing down. Water the soil until it is moist but not soggy. Place the pot in a warm, sunny location and keep the soil consistently moist throughout the germination process. This method may take 3-6 weeks for germination.
Step 3: Caring for Your Germinated Mango Seed
Once the mango seed has sprouted, it’s time to provide the necessary care to ensure it grows into a strong, healthy plant.
- Transplanting the Seedling: If you used the paper towel or water soak method, you will need to transplant the germinated seed into a pot with soil. Choose a pot with drainage holes and fill it with well-draining soil. Carefully transfer the seedling, taking care not to damage the delicate root system. Position the seedling so that the top of the root is just below the soil surface. Gently press the soil around the seedling to provide support.
- Watering: Water the mango seedling regularly, ensuring the soil remains consistently moist. However, avoid overwatering, as this can lead to rootrot and other issues. It is important to strike a balance between providing enough moisture for the seedling to thrive, while not allowing the soil to become waterlogged. As a general rule, water the seedling when the top inch of soil feels dry to the touch.
- Lighting: Mango seedlings require plenty of sunlight to grow strong and healthy. Position the pot in a location that receives at least six hours of direct sunlight per day. If natural sunlight is not available or insufficient, consider using a grow light to provide the necessary light exposure.
- Fertilizing: To support healthy growth, it is important to provide the mango seedling with the proper nutrients. Use a balanced, slow-release fertilizer, following the package instructions for application rates and frequency. Be careful not to over-fertilize, as this can lead to nutrient imbalances and other issues.
Step 4: Transplanting Your Mango Plant Outdoors
As your mango plant grows and matures, it will eventually need to be transplanted to a larger container or planted in the ground outdoors. This is an important step in the journey towards a majestic mango tree.
When to Transplant: The ideal time to transplant your mango plant outdoors is when it has reached a height of approximately 2-3 feet. This indicates that the plant has developed a strong root system and is ready to thrive in its new environment.
Choosing the Right Location: Selecting the right location for your mango plant is essential for its long-term success. Mango trees require full sun, well-draining soil, and protection from strong winds. Additionally, they are not cold-hardy, so if you live in a region that experiences cold temperatures or frost, consider planting your mango tree in a large container that can be moved indoors during the winter months.
Preparing the Planting Site: Prepare the planting site by digging a hole that is approximately twice as wide and just as deep as the root ball of your mango plant. Loosen the soil at the bottom and sides of the hole to encourage root growth. Add a layer of compost or well-rotted manure to the bottom of the hole to provide additional nutrients.
Transplanting the Mango Plant: Carefully remove the mango plant from its pot, ensuring that the root ball stays intact. Place the plant in the hole, making sure that the top of the root ball is level with the surrounding soil. Fill in the hole with soil, gently pressing it around the root ball to eliminate any air pockets. Water the plant thoroughly to help settle the soil.
Aftercare: In the weeks following transplanting, it is important to provide your mango plant with the proper care to ensure a successful transition. Water the plant regularly, keeping the soil consistently moist but not waterlogged. Continue to fertilize the plant with a balanced, slow-release fertilizer, and provide protection from harsh weather conditions and pests.
In conclusion, germinating a simple mango pit into a majestic plant is a rewarding and educational process. By following the steps outlined in this guide, you can embark on an exciting horticultural journey that culminates in a beautiful, fruit-bearing mango tree. Not only will you have the satisfaction of nurturing a plant from seed to maturity, but you will also contribute to a more sustainable and environmentally friendly world. So, embrace your inner mango maestro and begin your journey towards mango mastery today!